Previously I wrote on why ads are needed to help maintaining an app. Read the article herehttp://blog.kerul.net/2011/05/generating-revenue-from-free-mobile.html.
This is quite a long tutorial, there are 3 major steps involved. The experiment is done using Windows 7, Eclipse Helios and AdMob SDK 4.1.0 (which currently is the latest).
STEP 1: Get the ads from AdMob.com
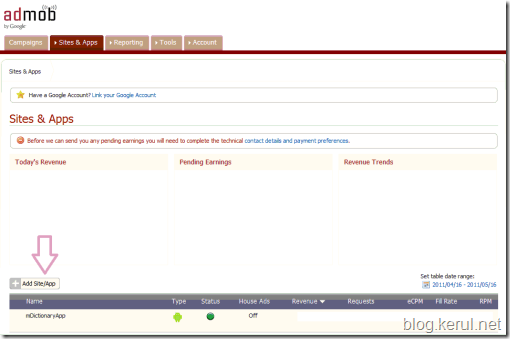
To display the AdMob ads in your Android mobile apps, you need to register first at the admob.com . After completing the registration, login and Add Site/App. Refer to Figure 1.
Figure 1
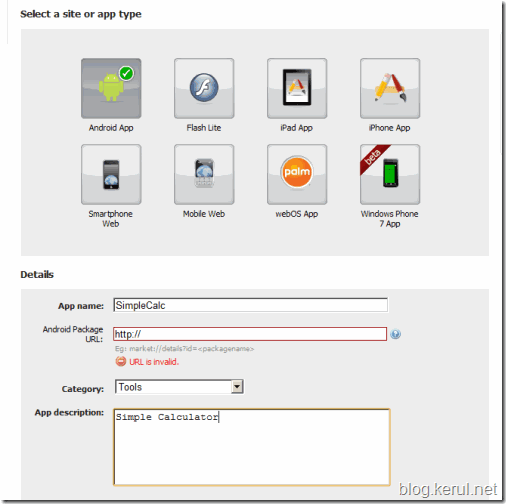
Choose the desired platform and fill in the details (as in Figure 2). Just put http:// in the Android Package URL if your app is not published in the market yet. And click Continue.
Figure 2
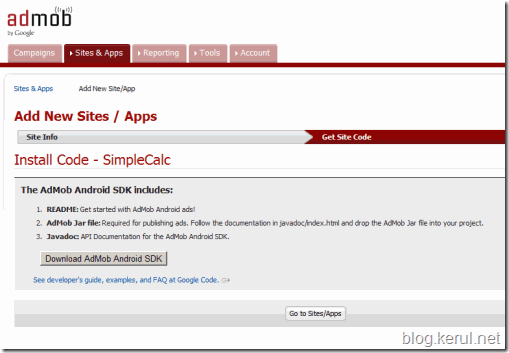
Download the AdMob Android SDK, and save the zip file in your machine. Make sure to extract the file and save it to your hard disk (anywhere is possible).
Figure 3
STEP 2: Install the AdMob SDK into your Android project.
The most important file in the AdMob Android SDK that you download is GoogleAdMobAdsSdk-4.1.0.jar . Currently it’s in version 4.1.0 .
Figure 4
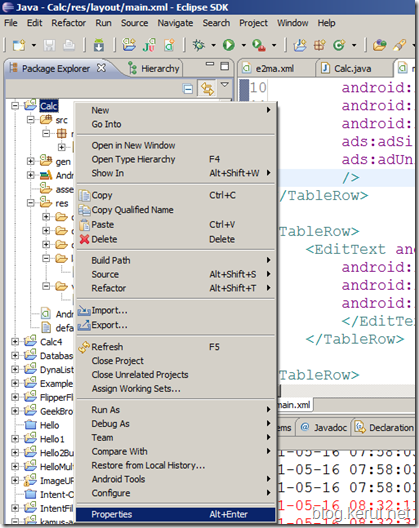
Go to your project folder (in Eclipse), and right click to your project (Figure 5). Choose Properties.
Figure 5
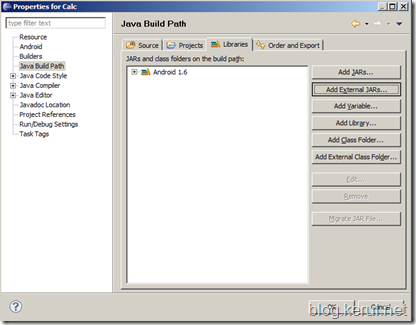
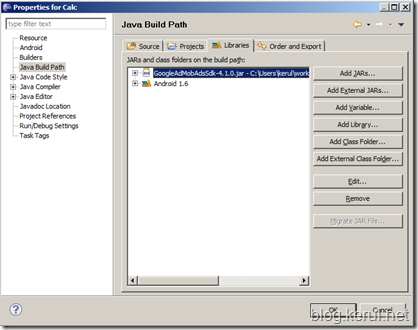
Click the Java Build Path on your left. Choose the Libraries in the tab, and click Add External JARs. Locate the JAR file (GoogleAdMobAdsSdk-4.1.0.jar). And click OK.
Figure 6
Figure 7
Figure 8
STEP 3: The codes to display ads in your app.
Add some additional activity and permissions in the manifest.xml file. Notice the new activity “comm.google.ads.Adactivity”. And your app need to have these two permissions INTERNET and ACCESS_NETWORK_STATE.
<?xml version="1.0" encoding="utf-8"?>

<manifest xmlns:android="http://schemas.android.com/apk/res/android"

      package="my.android.calc"

      android:versionCode="1"

      android:versionName="1.0">

    <application android:icon="@drawable/icon" android:label="@string/app_name">

        <activity android:name=".Calc"

                  android:label="@string/app_name">

            <intent-filter>

                <action android:name="android.intent.action.MAIN" />

                <category android:name="android.intent.category.LAUNCHER" />

            </intent-filter>

        </activity>

    <activity android:name="com.google.ads.AdActivity"

                      android:configChanges="keyboard|keyboardHidden|orientation"/>

    </application>


  <uses-permission android:name="android.permission.INTERNET"/>

  <uses-permission android:name="android.permission.ACCESS_NETWORK_STATE"/>

  <uses-sdk android:minSdkVersion="4" />


</manifest>
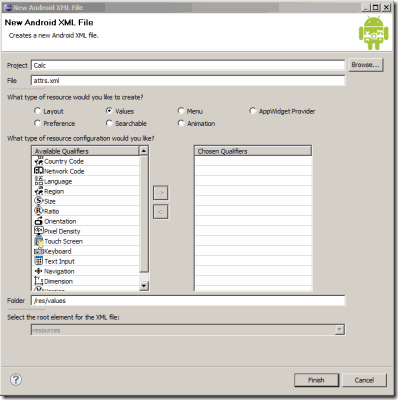
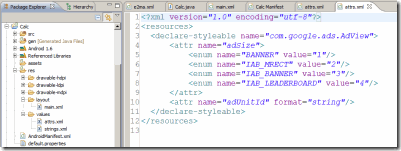
Create attr.xml file in the res/values . This is to store the ads properties. Right click the res/values folder in your project navigator to create the Android XML file.
<?xml version="1.0" encoding="utf-8"?>

<resources>

  <declare-styleable name="com.google.ads.AdView">

      <attr name="adSize">

          <enum name="BANNER" value="1"/>

          <enum name="IAB_MRECT" value="2"/>

          <enum name="IAB_BANNER" value="3"/>

          <enum name="IAB_LEADERBOARD" value="4"/>

      </attr>

      <attr name="adUnitId" format="string"/>

  </declare-styleable>

</resources>
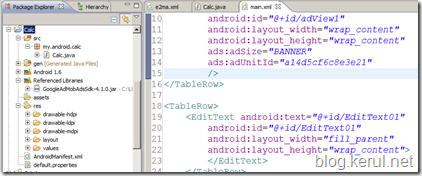
Create the AdView widget in the layout (for example main.xml). Make sure change the adUnitId to your own Publisher ID, which is available in your adMob account.
<TableRow>

    <com.google.ads.AdView

        xmlns:ads="http://schemas.android.com/apk/lib/com.google.ads"

        android:id="@+id/adView1"

        android:layout_width="wrap_content"

        android:layout_height="wrap_content"

        ads:adSize="BANNER"

        ads:adUnitId="YOUR_PUBLISHER_ID_HERE"

        />

</TableRow>
This is the last step. Invoke the ads request in the source code that has the apps UI. This is done in thesource_file.java .
Import this APIs;
import com.google.ads.AdRequest;

import com.google.ads.AdView;
These are the codes to display the ads in the app.
AdView adview = (AdView)findViewById(R.id.adView1);

AdRequest re = new AdRequest();

re.setTesting(true);

adview.loadAd(re);
Hit this link to get the full Android project.
***You won’t see the ads if you test this in the emulator. I’ve done the testing in the Samsung Galaxy S and it works. See the screenshot below. Notice the ad is on top of the application.
STEP Additional: In case you’d like to filter the ads
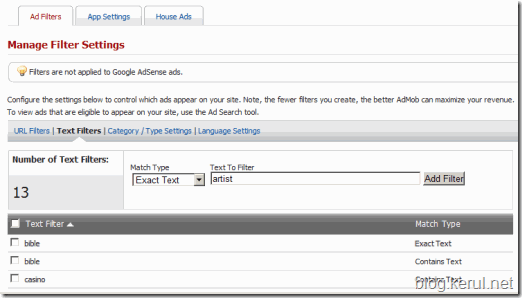
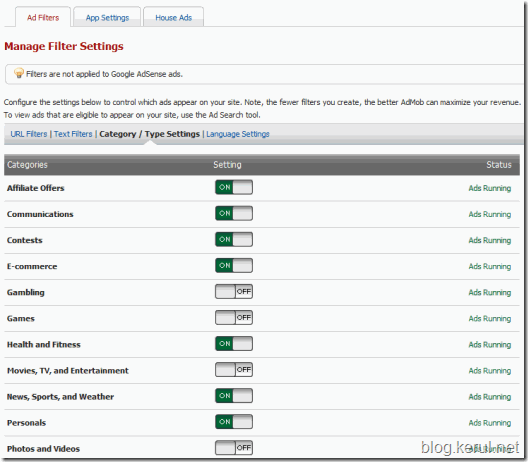
Filtering the ads: In case you are concern with the ads displayed by AdMob, you might want to do some filtering. You could filter which type of ads could be displayed or not by blocking some keywords. Go into your AdMob account and open your Ste & App. Just add the blocked keyword in the Text Filters. Or you could just blocked ads by Category / Type.
Ad filtering by keyword.
Ad filtering by Category/Type.
Feel good… I think this is the longest tutorial in my blog. Managed to finish in one whole day. Hope this little post helps you…
Related links
- The code sample –> download here.
- Official Documentation (which is not updated timely) -http://code.google.com/mobile/ads/docs/android/fundamentals.html
- Official Discussion (AdMob SDK 4.0.10) - http://groups.google.com/group/google-admob-ads-sdk/browse_thread/thread/3b885d3fe5bb21a5?pli=1
- A very good tutorial for AdMob SDK 4.0.4 - http://android.jmsliu.com/209/add-google-admob-in-android-application.html?utm_source=rss&utm_medium=rss&utm_campaign=add-google-admob-in-android-application

